Skip to content
  • About
  • Contact
  • Docs
  • Features
  • Home

Configurations

5
  • Setup RAID Level 6
  • Setup RAID Level 5
  • How To Add Swap on RHEL or Centos based system
  • Website Migration to Non-Panel OpenLiteSpeed Server
  • Linux Server Performance Tuning

CyberPanel

9
  • Mounting /tmp on a Separate File
  • Updating CyberPanel Main VirtualHost Configuration
  • Updating CyberPanel vHosts Configuration
  • How to Change CLI PHP on CyberPanel
  • How to Update PHP Version to 8.1 in CyberPanel (From 7.3, 7.4, or 8.0)
  • CyberPanel Server Cleanup: Logs, Dumps, Backups
  • CyberPanel Full LSPHP Installation PHP 7.4 – 8.3
  • CyberPanel / OpenLiteSpeed: Clean LSPHP Session Files
  • SSL Certificate Management in CyberPanel via SSH

Hestia Control Panel

6
  • Fixing Email Bounce Back Issue in Hestia (Exim4 Blacklist Rejection)
  • Managing Fail2Ban in HestiaCP Server
  • Installing and Configuring PHP Versions in HestiaCP
  • phpMyAdmin Not Found in HestiaCP
  • Setting Up a Reverse Proxy for any Port in HestiaCP
  • How to Install Let’s Encrypt SSL in Hestia CP (Hostname, Admin Panel, and Email Server)

WHM/cPanel

6
  • Setting Up a Reverse Proxy on cPanel/WHM for Port 8081
  • How to increase the size of the cPanel-generated /tmp filesystem
  • Installing Old PHP Versions on a cPanel/WHM Server
  • Fixing “550: Your Country is Not Allowed to Connect to This Server” Error in Exim (cPanel)
  • Enable WP-CLI in CageFS on CloudLinux Servers (WHM/cPanel)
  • Securing /tmp and /var/tmp with a Dedicated Loopback Filesystem

Nagios

5
  • Service Checks
  • Uptime Checks
  • Disk Space Checks
  • Load Checks
  • Email Related Checks

WordPress

3
  • WordPress Core Reinstallation Guide
  • Managing WordPress Users via WP-CLI
  • Website Duplication, Migration, or Domain Change

Operating System

1
  • Server Reboot (RHEL or Centos based system)

AWS

1
  • How to Resize EBS Volumes on AWS

Databases

2
  • MySQL
    • Optimizing MySQL Performance
    • Recovering MySQL in Plesk When InnoDB Crashes

CloudLinux

4
  • Moving cagefs-skeleton directory
  • Enable WP-CLI in CageFS on CloudLinux Servers (WHM/cPanel)
  • Enable bc in CageFS on CloudLinux Servers(WHM/cPanel)
  • How to Upgrade MySQL 5.x to MySQL 8.0 on CloudLinux (WHM server) with MySQL Governor

Cloudflare

1
  • Configuring Security Headers in Cloudflare

ISPmanager

1
  • Install Free SSL (Let’s Encrypt) for domain.tld on ISPmanager with NGINX

Plesk

1
  • Plesk Admin Login Blocked – IP Restriction Recovery Guide

VPN

4
  • Install OpenVPN Open Source in Linux CentOS Ubuntu Debian Servers
  • Protected: OpenVPN Installation & Fix Wiki (CloudLinux / CentOS 7 & 8)
  • Outline VPN Installation & Management Guide
  • Installing AdGuard Home on Debian/Ubuntu (Docker)
View Categories
  • Home
  • Docs
  • Cloudflare
  • Configuring Security Headers in Cloudflare

Configuring Security Headers in Cloudflare

This guide explains how to configure security headers in Cloudflare using response header modification rules. These headers enhance security by preventing attacks such as clickjacking, MIME-type sniffing, and unauthorized resource loading.

Creating a Rule to Modify Response Headers

1. Log in to Cloudflare
2. Select your domain.
3. Navigate to Rules → Transform Rules → Modify Response Header.
4. Click Create Rule and name it (e.g., Security Headers).

Define Conditions for Incoming Requests

Under If incoming requests match…, use the following expressions:

 For a specific domain:

(http.request.full_uri contains "yourdomain.com")

For all requests (recommended):

(http.request.full_uri wildcard "*")

This ensures the rule applies to every incoming request.

Adding Security Headers

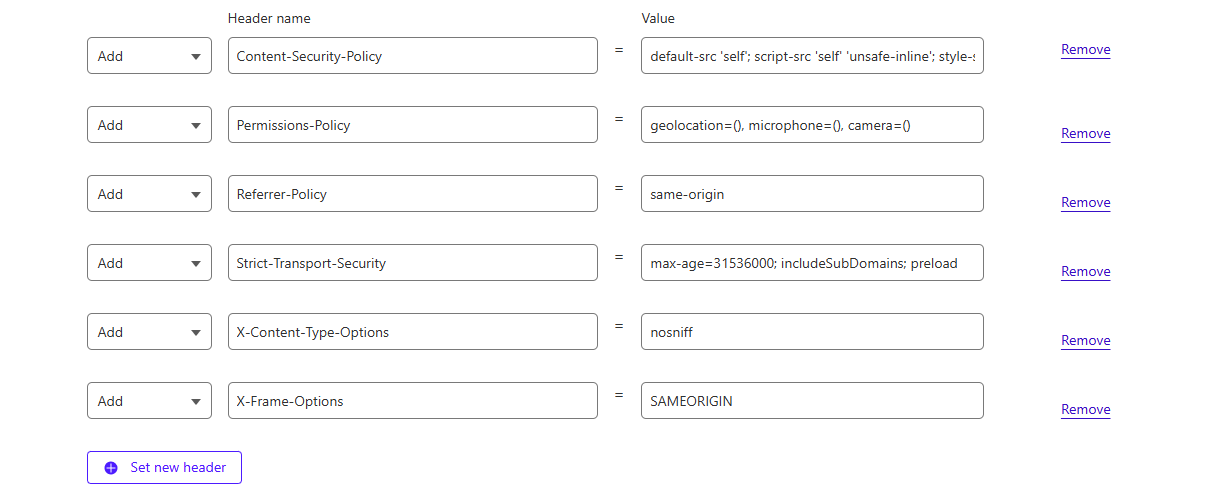
Under Modify response header, configure the following headers:

Strict-Transport-Security (HSTS)

Header Name: Strict-Transport-Security

max-age=31536000; includeSubDomains; preload
Content-Security-Policy (CSP)

Header Name: Content-Security-Policy

default-src 'self'; script-src 'self' 'unsafe-inline'; style-src 'self' 'unsafe-inline'
Permissions-Policy

Header Name: Permissions-Policy

geolocation=(), microphone=(), camera=()
 X-Content-Type-Options

Header Name: X-Content-Type-Options

nosniff
 X-Frame-Options

Header Name: X-Frame-Options

SAMEORIGIN
Referrer-Policy

Header Name: Referrer-Policy

same-origin

Example Screenshot :

Deploy and Verify

1. Save & Deploy the rule.
2. Purge Cloudflare Cache
3. Navigate to Cloudflare Dashboard → Caching → Purge Everything.
4. Verify Headers Using CURL:

curl -I https://yourdomain.com
Test Headers at Security Headers Scanner:

Visit Security Headers and enter your domain.

Troubleshooting

– If headers are missing, check:
– Caching Issues:Purge Cloudflare cache.
– Other Rules Conflicts:  Ensure no other rules override your headers.
– DNS Proxying: The domain should be proxied (orange cloud enabled) in Cloudflare.

Conclusion

By implementing these security headers, you enhance your site’s protection against various web-based attacks. 🚀 Now your Cloudflare-protected website is more secure!

Table of Contents
  • Creating a Rule to Modify Response Headers
  • Define Conditions for Incoming Requests
  • Adding Security Headers
    • Strict-Transport-Security (HSTS)
    • Content-Security-Policy (CSP)
    • Permissions-Policy
    •  X-Content-Type-Options
    •  X-Frame-Options
  • Referrer-Policy
  • Deploy and Verify
  • Test Headers at Security Headers Scanner:
  • Troubleshooting
  • Conclusion

Share This Article :

  • Facebook
  • X
  • LinkedIn
  • Pinterest

Was it helpful ?

  • Happy
  • Normal
  • Sad
  • About
  • Contact
  • Docs
  • Features
  • Home

© 2026 Panel Web Hosting

  • About
  • Contact
  • Docs
  • Features
  • Home