Skip to content
  • About
  • Contact
  • Docs
  • Features
  • Home

Configurations

5
  • Setup RAID Level 6
  • Setup RAID Level 5
  • How To Add Swap on RHEL or Centos based system
  • Website Migration to Non-Panel OpenLiteSpeed Server
  • Linux Server Performance Tuning

CyberPanel

9
  • Mounting /tmp on a Separate File
  • Updating CyberPanel Main VirtualHost Configuration
  • Updating CyberPanel vHosts Configuration
  • How to Change CLI PHP on CyberPanel
  • How to Update PHP Version to 8.1 in CyberPanel (From 7.3, 7.4, or 8.0)
  • CyberPanel Server Cleanup: Logs, Dumps, Backups
  • CyberPanel Full LSPHP Installation PHP 7.4 – 8.3
  • CyberPanel / OpenLiteSpeed: Clean LSPHP Session Files
  • SSL Certificate Management in CyberPanel via SSH

Hestia Control Panel

6
  • Fixing Email Bounce Back Issue in Hestia (Exim4 Blacklist Rejection)
  • Managing Fail2Ban in HestiaCP Server
  • Installing and Configuring PHP Versions in HestiaCP
  • phpMyAdmin Not Found in HestiaCP
  • Setting Up a Reverse Proxy for any Port in HestiaCP
  • How to Install Let’s Encrypt SSL in Hestia CP (Hostname, Admin Panel, and Email Server)

WHM/cPanel

6
  • Setting Up a Reverse Proxy on cPanel/WHM for Port 8081
  • How to increase the size of the cPanel-generated /tmp filesystem
  • Installing Old PHP Versions on a cPanel/WHM Server
  • Fixing “550: Your Country is Not Allowed to Connect to This Server” Error in Exim (cPanel)
  • Enable WP-CLI in CageFS on CloudLinux Servers (WHM/cPanel)
  • Securing /tmp and /var/tmp with a Dedicated Loopback Filesystem

Nagios

5
  • Service Checks
  • Uptime Checks
  • Disk Space Checks
  • Load Checks
  • Email Related Checks

WordPress

3
  • WordPress Core Reinstallation Guide
  • Managing WordPress Users via WP-CLI
  • Website Duplication, Migration, or Domain Change

Operating System

1
  • Server Reboot (RHEL or Centos based system)

AWS

1
  • How to Resize EBS Volumes on AWS

Databases

2
  • MySQL
    • Optimizing MySQL Performance
    • Recovering MySQL in Plesk When InnoDB Crashes

CloudLinux

4
  • Moving cagefs-skeleton directory
  • Enable WP-CLI in CageFS on CloudLinux Servers (WHM/cPanel)
  • Enable bc in CageFS on CloudLinux Servers(WHM/cPanel)
  • How to Upgrade MySQL 5.x to MySQL 8.0 on CloudLinux (WHM server) with MySQL Governor

Cloudflare

1
  • Configuring Security Headers in Cloudflare

ISPmanager

1
  • Install Free SSL (Let’s Encrypt) for domain.tld on ISPmanager with NGINX

Plesk

1
  • Plesk Admin Login Blocked – IP Restriction Recovery Guide

VPN

4
  • Install OpenVPN Open Source in Linux CentOS Ubuntu Debian Servers
  • Protected: OpenVPN Installation & Fix Wiki (CloudLinux / CentOS 7 & 8)
  • Outline VPN Installation & Management Guide
  • Installing AdGuard Home on Debian/Ubuntu (Docker)
View Categories
  • Home
  • Docs
  • Configurations
  • Setup RAID Level 5

Setup RAID Level 5

Create a RAID5 Array with mdadm on Linux

In this tutorial we will setup a RAID5 array, which is striping across multiple drives with distributed paritiy, which is good for redundancy. We will be using Ubuntu for our Linux Distribution, but the technique applies to other Linux Distributions as well.

What are we trying to achieve

We will run a server with one root disk and 6 extra disks, where we will first create our raid5 array with three disks, then I will show you how to expand your raid5 array by adding three other disks.

Things fail all the time, and it’s not fun when hard drives breaks, therefore we want to do our best to prevent our applications from going down due to hardware failures. To achieve data redundancy, we want to use three hard drives, which we want to add into a raid configuration that will proviide us:

striping, which is the technique of segmenting logically sequential data, so that consecutive segments are stored on different physical storage devices.
distributed parity, where parity data are distributed between the physical disks, where there is only one parity block per disk, this provide protection against one physical disk failure, where the minimum number of disks are three.

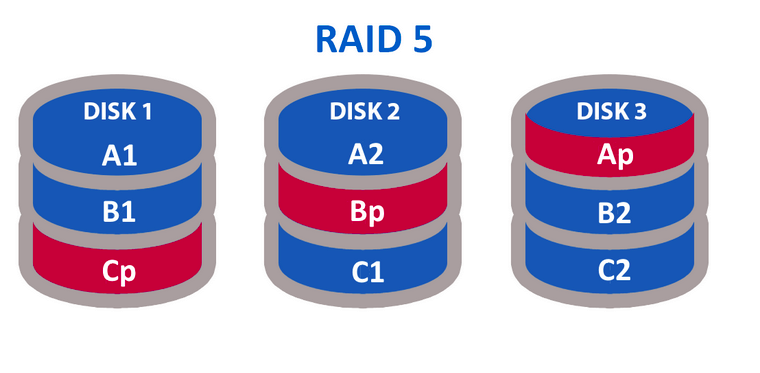
This is how a RAID5 array looks like


Hardware Overview

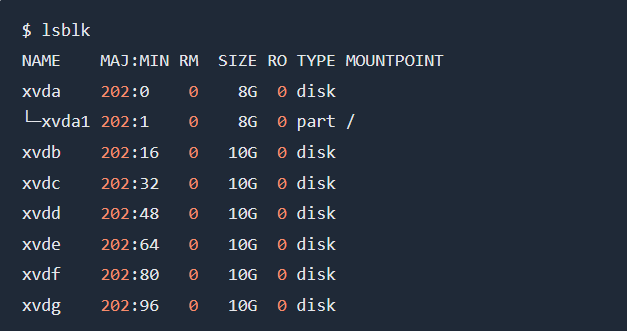
We will have a Linux server with one root disk and six extra disks:

Dependencies

We require mdadm to create our raid configuration:

sudo apt update
sudo apt install mdadm -y

Format Disks

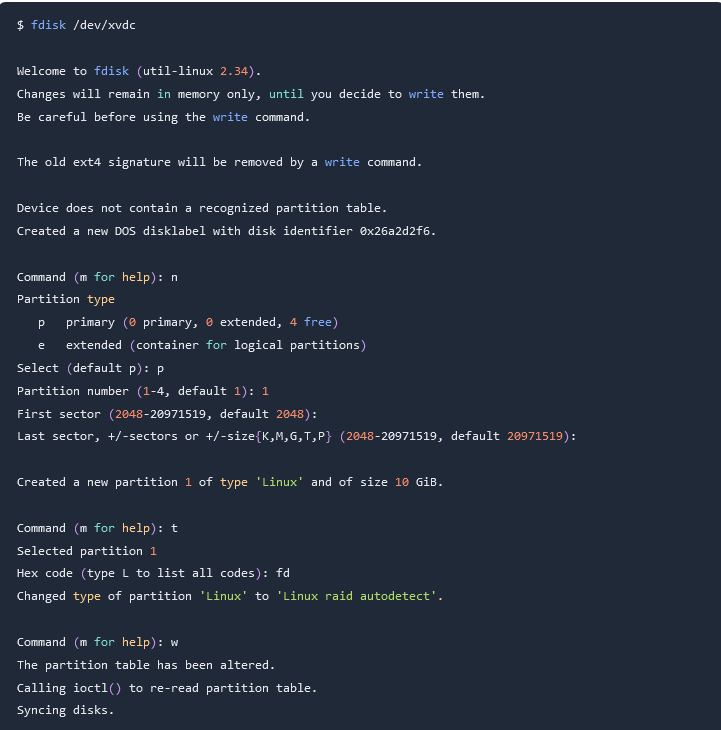
First we will format and partition the following disks: /dev/xvdb, /dev/xvdc, /dev/xvdd, I will demonstrate the process for one disk, but repeat them for the other as well:


Create RAID5 Array

Using mdadm, create the /dev/md0 device, by specifying the raid level and the disks that we want to add to the array:

mdadm --create /dev/md0 --level=5 --raid-devices=3 /dev/xvdb1 /dev/xvdc1 /dev/xvdd1

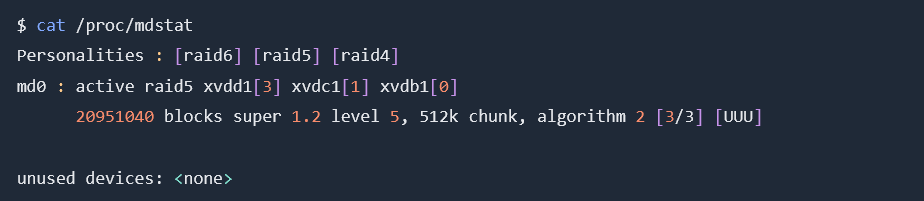
Now that our device has been added, we can monitor the process:

cat /proc/mdstat

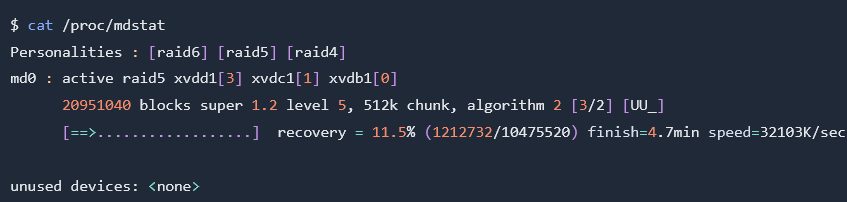
As you can see, currently its at 11.5%, give it some time to let it complete, you should treat the following as a completed state:

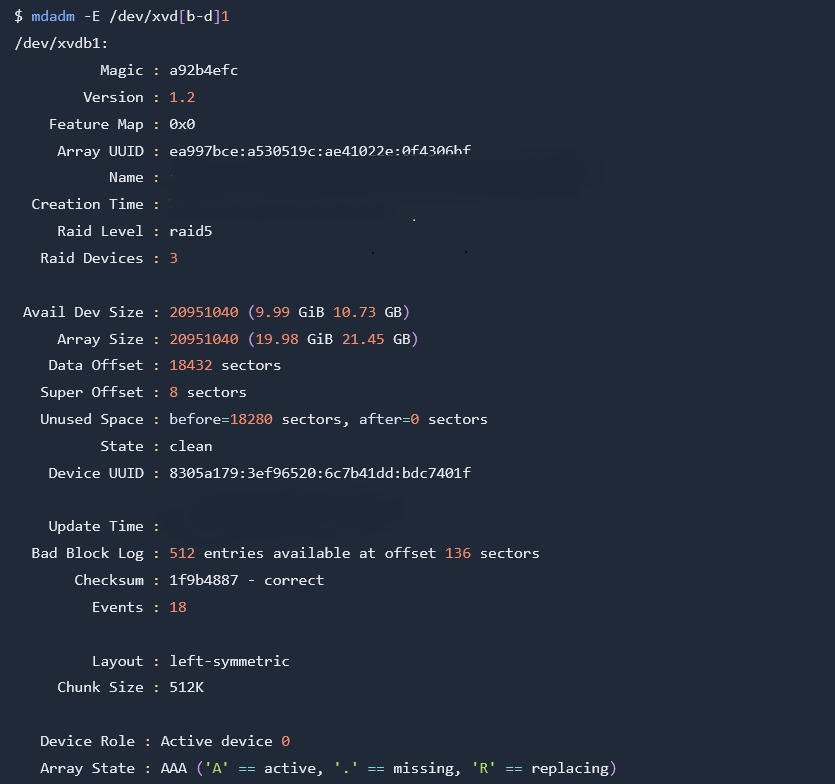
We can also inspect devices with mdadm:

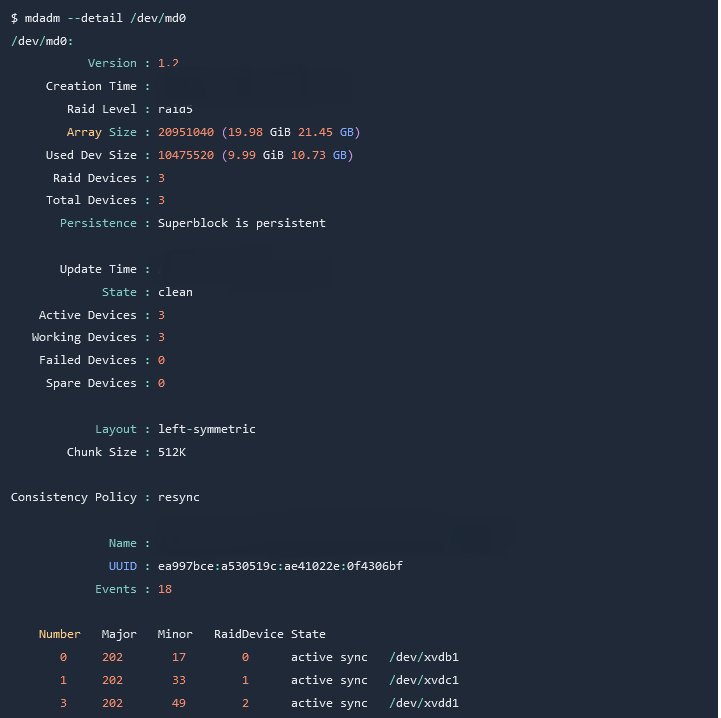
To get information about your raid5 device:

Create Filesystems

We will use our /dev/md0 device and create a ext4 filesystem:

We can then verify that by looking at our block devices using lsblk:

Share This Article :

  • Facebook
  • X
  • LinkedIn
  • Pinterest

Was it helpful ?

  • Happy
  • Normal
  • Sad
  • About
  • Contact
  • Docs
  • Features
  • Home

© 2026 Panel Web Hosting

  • About
  • Contact
  • Docs
  • Features
  • Home