Setup RAID Level 6 (Striping with Double Distributed Parity) in Linux
RAID 6 is upgraded version of RAID 5, where it has two distributed parity which provides fault tolerance even after two drives fails. Mission critical system still operational incase of two concurrent disks failures. It’s alike RAID 5, but provides more robust, because it uses one more disk for parity.
In our earlier article, we’ve seen distributed parity in RAID 5, but in this article we will going to see RAID 6 with double distributed parity. Don’t expect extra performance than any other RAID, if so we have to install a dedicated RAID Controller too. Here in RAID 6 even if we loose our 2 disks we can get the data back by replacing a spare drive and build it from parity.
To setup a RAID 6, minimum 4 numbers of disks or more in a set are required. RAID 6 have multiple disks even in some set it may be have some bunch of disks, while reading, it will read from all the drives, so reading would be faster whereas writing would be poor because it has to stripe over multiple disks.
Now, many of us comes to conclusion, why we need to use RAID 6, when it doesn’t perform like any other RAID. Hmm… those who raise this question need to know that, if they need high fault tolerance choose RAID 6. In every higher environments with high availability for database, they use RAID 6 because database is the most important and need to be safe in any cost, also it can be useful for video streaming environments.
Pros and Cons of RAID 6
1.Performance are good.
2.RAID 6 is expensive, as it requires two independent drives are used for parity functions.
3.Will loose a two disks capacity for using parity information (double parity).
4.No data loss, even after two disk fails. We can rebuilt from parity after replacing the failed disk.
5.Reading will be better than RAID 5, because it reads from multiple disk, But writing performance will be very poor without dedicated RAID Controller.
Requirements
Minimum 4 numbers of disks are required to create a RAID 6. If you want to add more disks, you can, but you must have dedicated raid controller. In software RAID, we will won’t get better performance in RAID 6. So we need a physical RAID controller.
Step 1: Installing mdadm Tool and Examine Drives
1.let’s install the tool using following command according to your Linux distribution.
yum install mdadm [on RedHat systems]
apt-get install mdadm [on Debain systems]
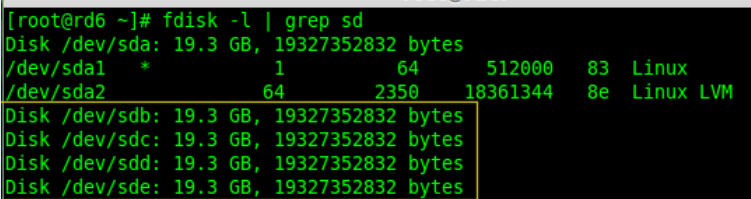
2.After installing the tool, now it’s time to verify the attached four drives that we are going to use for raid creation using the following ‘fdisk‘ command.
fdisk -l | grep sd
3. Before creating a RAID drives, always examine our disk drives whether there is any RAID is already created on the disks.
mdadm -E /dev/sd[b-e]
mdadm --examine /dev/sdb /dev/sdc /dev/sdd /dev/sde
Note: In the above image depicts that there is no any super-block detected or no RAID is defined in four disk drives. We may move further to start creating RAID 6.
Step 2: Drive Partitioning for RAID 6
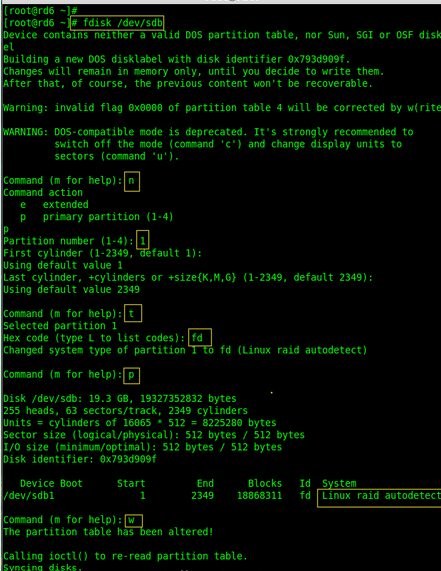
4. Now create partitions for raid on ‘/dev/sdb‘, ‘/dev/sdc‘, ‘/dev/sdd‘ and ‘/dev/sde‘ with the help of following fdisk command. Here, we will show how to create partition on sdb drive and later same steps to be followed for rest of the drives.
Create /dev/sdb Partition
fdisk /dev/sdb
Please follow the instructions as shown below for creating partition.
The method of partitioning depends on the disk size:
For disks <= 2TB → by default it will be MBR (Master Boot Record)
For disks larger than 2TB → Use GPT (GUID Partition Table) with the G command in fdisk at the beginning, and for the 8th step, go with 8.A.
A.Press ‘G’ for a GPT partition and continue with the steps; otherwise, start with ‘N’.
1.Press ‘n‘ for creating new partition.
2.Then choose ‘P‘ for Primary partition.
3.Next choose the partition number as 1.
4.Define the default value by just pressing two times Enter key.
5.Next press ‘P‘ to print the defined partition.
6.Press ‘L‘ to list all available types.
7.Type ‘t‘ to choose the partitions.
8.Choose ‘fd‘ for Linux raid auto and press Enter to apply.
8.A For GTP : we use Linux raid: Enter 29 → Choose Linux RAID (Linux RAID under GPT).
9.Then again use ‘P‘ to print the changes what we have made.
10.Use ‘w‘ to write the changes.
 Create /dev/sdb Partition
Continue the same procedure for /dev/sdc /dev/sdd /dev/sde
fdisk /dev/sdc

fdisk /dev/sdd

fdisk /dev/sde
5. After creating partitions, it’s always good habit to examine the drives for super-blocks. If super-blocks does not exist than we can go head to create a new RAID setup.
# mdadm -E /dev/sd[b-e]1
or
# mdadm --examine /dev/sdb1 /dev/sdc1 /dev/sdd1 /dev/sde1

Step 3: Creating md device (RAID)
6. Now it’s time to create Raid device ‘md0‘ (i.e. /dev/md0) and apply raid level on all newly created partitions and confirm the raid using following commands.
# mdadm --create /dev/md0 --level=6 --raid-devices=4 /dev/sdb1 /dev/sdc1 /dev/sdd1 /dev/sde1
# cat /proc/mdstat

7. You can also check the current process of raid using watch command as shown in the screen grab below.
# watch -n1 cat /proc/mdstat
8. Verify the raid devices using the following command.
mdadm -E /dev/sd[b-e]1
Note:: The above command will be display the information of the four disks, which is quite long so not possible to post the output or screen grab here.
9. Next, verify the RAID array to confirm that the re-syncing is started.
mdadm --detail /dev/md0
Step 4: Creating FileSystem on Raid Device
10. Create a filesystem using xfs for ‘/dev/md0‘ and mount it under /mnt/raid6. Here we’ve used xfs, but you can use any type of filesystem as per your choice.
mkfs.xfs /dev/md0
11. Mount the created filesystem under /mnt/raid6 and verify the files under mount point, we can see lost+found directory.
# mkdir /mnt/raid6
# mount /dev/md0 /mnt/raid6/
# ls -l /mnt/raid6/
12. Create some files under mount point and append some text in any one of the file to verify the content.
 touch /mnt/raid6/raid6_test.txt
 ls -l /mnt/raid6/
 echo "Test raid setups" > /mnt/raid6/raid6_test.txt
 cat /mnt/raid6/raid6_test.txt
13.Add an entry in /etc/fstab to auto mount the device at the system startup and append the below entry, mount point may differ according to your environment.
Before modifying /etc/fstab, we need to get the UUID of the device.
blkid /dev/md0
Example Output:
/dev/md0: UUID=”d92b8c1a-5f4e-4c3f-b75b-5c3d799fbfd7″ TYPE=”xfs”
Add Entry to /etc/fstab
vim /etc/fstab
Append the following line (replace UUID=<your-uuid> and /mnt/md0 with your mount point):
UUID=d92b8c1a-5f4e-4c3f-b75b-5c3d799fbfd7 /mnt/raid6/ xfs defaults 0 2
Explanation of the fields:
1. UUID=d92b8c1a-5f4e-4c3f-b75b-5c3d799fbfd7→ Unique identifier for the device
2. /mnt/raid6/→ Mount point (change as needed)
3. xfs→ Filesystem type (adjust if using ext4,btrfs etc.)
4. defaults→ Mount options (default: read/write, exec, auto)
5. 0→ Dump backup (0 = no backup)
6. 2→ Filesystem check order (1for root,2for others)
14. Next, execute ‘mount -a‘ command to verify whether there is any error in fstab entry.
mount -av
Step 5: Save RAID 6 Configuration
15. Please note by default RAID don’t have a config file. We have to save it by manually using below command and then verify the status of device ‘/dev/md0‘.
# mdadm --detail --scan --verbose >> /etc/mdadm.conf
# mdadm --detail /dev/md0
Conclusion:
Here, we have seen how to setup RAID 6 using four disks. This RAID level is one of the expensive setup with high redundancy.